At some point in my twenties—earlier than it should have—fried food began to disagree with me. Fried cheese curds, fish, mozzarella sticks, mushrooms… and onions. Although, I never really like onion rings because they were usually embarrassing to eat; the breading slid off in my hand while the soggy, greasy onion hung out of my mouth like a cow’s tongue. I paint a pretty picture, don’t I?
To be honest, it’s okay. We all know fried food isn’t very healthy.
Enter the air fryer! We’ve got the breaded fish pretty well down, so putting an onion ring atop a turkey burger seemed like the logical next step.
Our first attempt was without using a recipe and it didn’t turn out so well. I documented it to show that not everything turns out as expected, and that’s okay!
Onion rings, take one.
They weren’t *awful*, they were just a little overdone and stuck together and not breaded correctly. You get the idea.
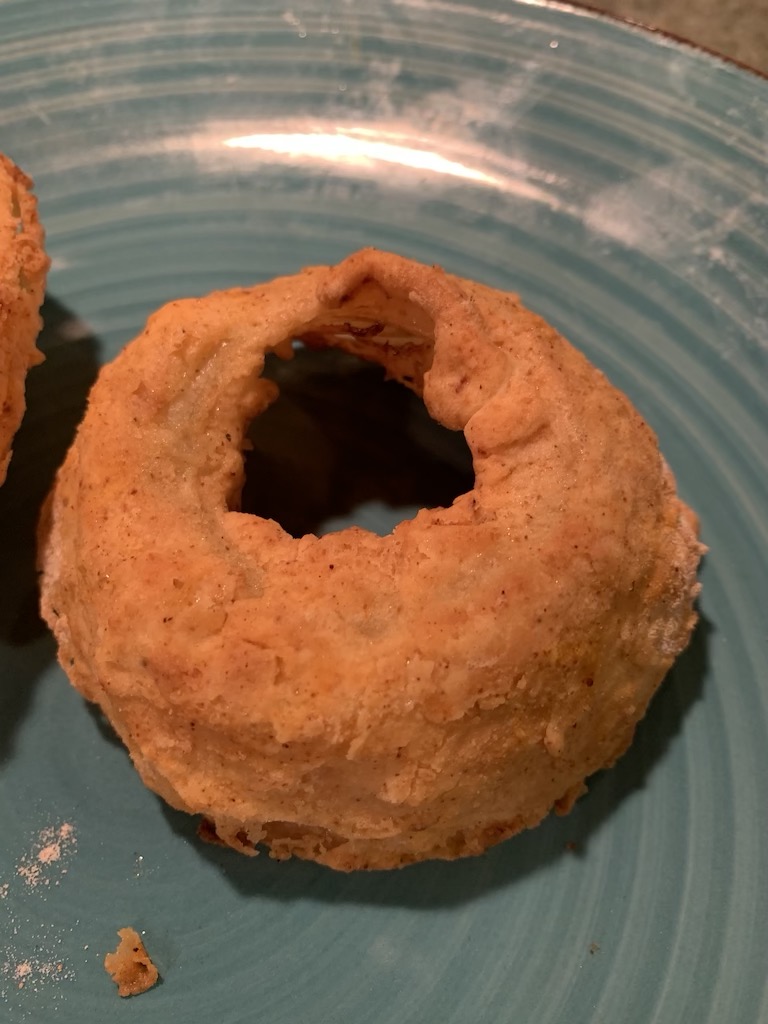
Take two involved following a recipe of sorts. The air fryer came with a cookbook that has a bloomin’ onion, so we co-opted it for only a few rings. One of the tricks is to soak the onions in ice water until you’re ready to use them. I’m pretty sure this is to prevent them from getting “soggy”.
A cold onion makes for a stiffer fry.
The second trick is to coat with the egg, then cover in the seasoned flour mixture, then dredge in the egg, and cover again with the flour mixture. The third trick is to only put as many onions into the fryer that will fit in one layer without touching.
In order to test the efficacy of this bag of tricks, we did a test batch before starting on the second version for the burgers. The results were positive.
Two rings in the 3qt fryer.
The double-dredge and some avocado spray helped the breading stick and make it the color we expected (I wanted them to look nice on turquoise plates):
This iPhone has an amazing camera.
Atop the turkey burgers again they went. – Yoda.
Don’t be jelly.
The addition of the onions made for a beautiful burger, but its presence was a bit lost among the rest of the amazing tastes and textures. I think if we try it again, we should try them on a couple of Beyond Burgers.
Air-fried Onion Rings
A top, side, front, bottom, or rear for any of your main dishes!
2-4white or yellow onion ringscut an inch in height
Equipment
Air Fryer
Method
Soak raw rings in ice water until ready to cook.
Preheat the air fryer to 400º for 5 minutes.
Prepare the onions by first dipping and coating them in the egg wash, then dip into the flour, then back into the egg, and back into the flour.
Place rings into an air fryer basket, not allowing them to touch (as much as you can manage) and spray with avocado oil. Fry for 7 minutes, flip and spray again, fry for another 7 minutes.
Despite my cooking prowess, I have been known to repeatedly order out (often enough to Facebook-friend the delivery guy) when I find something I *really* like. Extra-hot buffalo chicken wings were one of those repeated orders (this was way before Facebook, though).
Wings from Pizza Extreme (which appears to be now owned by Pizza Pit) were the catalyst for my transition from sorta vegetarian to completely vegetarian in 1999.
I used to order the 1 lb. wings and the 1/2 lb. fries (checking the current menu makes me feel a little ill) and would mostly finish them. Thankfully, this was when I was merely 20—an age when routine digestion and regularity weren’t as important or, lack thereof, surprising.
That fateful, final order must have come during a time of self-reflection—or extreme delusion (I was 20, after all; both of the previous could have been true)—as I distinctly remember picking up a wing and seeing a handful of pinfeathers. I threw the piece back into the round, aluminum container and put it in the fridge for my then-boyfriend… if he wanted to hear about it while eating them later. Thus began my un-chicken, total vegetarianism for, what would turn out to last roughly 20 years (more on that later).
Fast-forward to now! *cue fast forward tape noise from the 80s* *put hair up in pony-tail and put on blue eyeshadow!*
I’m an adult now, so I can exercise conscious decision-making when selecting the food I choose to eat. And, since Costco’s chicken is damn inexpensive, I buy a lot of it. A lot. And I freeze it for next time. And then I buy more, because, as we say in this house, “IT AIN’T GUNNA GO BAD!”
I’ll get to the actual food now since we are all witness (see above) to what happens when I let a month go by without writing a recipe.
The secret “sauce” in this is actually dry ingredients.
Many recipes suggest rinsing and patting the chicken dry before commencing. I’ll do this for the wings because I want to get the packaged liquid off, and the dry rub (well, toss) as close to the skin as possible.
Grab your favorite metal bowl and mix together 3 Tbsp arrowroot flour, 1 tsp each cayenne, garlic powder, and some salt and pepper (I almost typed “to taste”, but don’t taste this mixture cuz it’ll be like chalk).
Toss a handful of the wings in the bowl to coat, place on a prepared baking sheet lined with parchment paper, and repeat until you run out of wings.
I keep a separate cutting board for poultry. You should, too.
This is usually the point at which I realize that I’ve forgotten to turn on the oven. So, preheat the oven to 400° before you start the tossing process. When the oven is ready, put ’em in and set a timer. Mine goes something like, “Alexa? Set a chicken timer for fifteen minutes.”
While they’re enduring the first round of heat, you can make the blue cheese “cooling sauce”. Who am I kidding? This is just an excuse to get cheese into a meal that would otherwise be just fine without.
This takes some mayo, Mexican crema (or sour cream, or Greek yogurt), lemon juice, a couple of drops of Worchestershire, and crumbly blue cheese. We used celery and cucumber slices to deliver the sauce to our mouths. You can use whatever you have on hand.
“Cooling sauce” and sauce shovels.
The hot sauce is up to interpretation, so I’ll tell you how I make mine and you can adjust to your liking. Put a stick of butter in a small bowl and just barely melt it in the microwave, then squirt about a tablespoon of Sriracha in the bowl and stir it up.
By now, the timer should be going off, tell Alexa to hush, pull the wings out and flip each one over and set a ten-minute timer. Dance around the kitchen for ten minutes, pull the wings out and apply the hot sauce lovingly to each wing and put them back in for five more minutes.
Delicious, gooey, buttery hot wings.
Now, some folks would tell you to let them rest, but I say, throw caution to the wind! Plate ’em up and watch ’em go.
This is a highly-modified version of the black beans that Braulio used to make for Mickey’s brunch when he had time. Being the frugal Mexican that he is, he would use dried beans, soaked overnight, and twice-cooked them; his were also vegan. I use canned beans and chicken broth. Those are the biggest differences between his and mine.
I don’t have a long, drawn out post to make about these. But, I do miss my friend since he moved to Beloit to help take care of his mother-in-law.
Beans sharing the spotlight with a bunch of other good eats.Huevos Rancheros featuring these delicious beans.
Almost Braulio’s Black Beans
The tastiest black beans that I know how to make. Use them as a side with breakfast eggs, inside a burrito, or by themselves for lunch. I won't judge.
This is a quick side, a lifesaver on a cold winter day, and we can’t be friends if you don’t have the ingredients available in your pantry (actually, I don’t care for it when folks make that exclamation, so we can still be friends, regardless).
Butter, onion, tomatoes.
That’s it, have a great day!
JUST KIDDING!
Grab your 3- or 4-quart Dutch oven (even if you’re only making a small amount, I’ll explain later) and put some butter in there over medium heat.
Slice an onion into very large pieces and sauté for five minutes or until soft.
Dump in one can of diced tomatoes for every two people who will end up with a serving. For each pair of folks, fill up one can with water, veggie, or chicken broth and pour into the vessel (*this is where the three-ingredient-claim kinda falls down, but I would contend that the recipe is great, even if it’s four ingredients).
Bring to a simmer, cover, and set a timer for 30 minutes.
Grab your immersion blender and zip it into a smooth soup. This is where using the smallest Dutch oven isn’t the best idea. Immersion-blending it in a 2-quart will result in splattered shirts and faces.
Serve with a side of grilled cheese or tuna melts.
Three-Ingredient Tomato Soup
A throw-together soup with ingredients you hopefully have.
Sweet corn stands on back highways are the epitome of summertime in Wisconsin. Ears and ears stuffed in a brown paper bag for $6. You’d be silly not to get some, cook, and freeze it for January when the mere thought of wearing shorts gives ya chills.
Woodman’s has three-for-$1 right now, so we’ve been enjoying the treat each Sunday night with chicken on the grill.
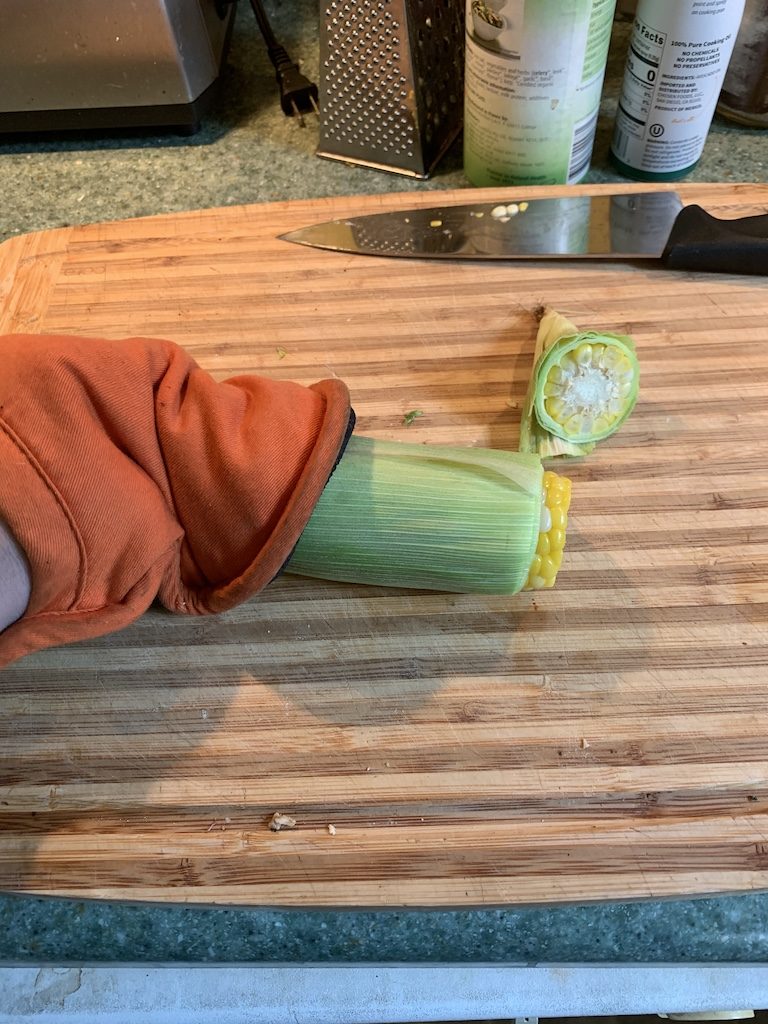
Put all three ears (why are they called ‘ears‘ anyway?) in the microwave and set it for six minutes. When it beeps, grab the ears with a hot pad and lay on a cutting board with the business end ready to cut.
The “business end” is opposite the strands at the top.
More about those strands, or “hairs”: there’s one strand for every kernel on the cob, so that’s a bit of an indication of how many healthy kernels there are, hiding in there.
After you slice the end off, grab the other end (with a hot pad), and slowly squeeze the ear out of the husk.
Squeeeeeeeze.Keep on keepin’ on!
Pushing the cob out keeps the hairs from sticking around, which makes it so much easier to eat.
Mostly strand-free.
Butter and salt (if you’re like the fella), plate. Crunch.
I mentioned in my avocado post that I wished someone would have told me how to mango much earlier in life. If you’re in the same boat, please keep on reading.
The first tip I learned was to locate the dimple. This tells you where the pit lays inside, in relation to the rest of the fruit.
Pit-dimple.
After you locate the pit, make two parallel cuts on either side, removing the “cheeks” to which they’re so fondly referred.
This is where it starts to get frustrating… because you just spent $2 on a mango and all you get are two little cheeks of meat! It’s true. Which is why I try to enjoy them when they’re in season.
Take a cheek in your hand and make four slices down the length of the inside, not cutting through the skin. Turn it 90° and repeat.
Flip the cheek inside out and enjoy some cubes of yum.


Recent Comments